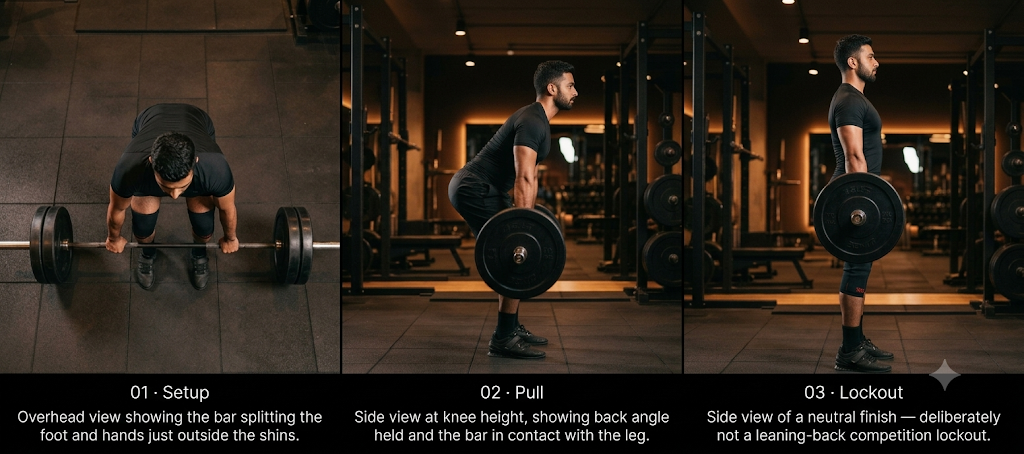
Set the bar over your mid-foot
Feet hip-width apart, bar directly over the middle of your foot — roughly an inch from your shins. Looked at from above, the bar should split your foot in half. Toes forward or very slightly out.
Home / Fitness / How to Perform Deadlift Form Correctly
HowTo · Posterior Chain
Setup, hip drive and lockout — the coaching cues that protect your back and maximise strength.
Quick answer
Proper deadlift form starts with your setup: feet hip-width apart, bar over mid-foot, neutral spine, shoulders slightly ahead of the bar. From there you push the floor away and drive your hips forward, keeping the bar in contact with your legs. A tall lockout with the glutes — not the lower back — finishes the lift.

Introduction
A deadlift that hurts your back is almost always a deadlift that was lost before the bar moved.
The pull itself is short and violent — there is no time to correct anything once it starts. That is why we spend most of a first deadlift session on the four seconds before the bar leaves the floor: where the bar sits over your foot, how far your hips travel back, whether your lats are engaged, whether the slack is out. Get those right and the lift largely coaches itself. Get them wrong and no amount of bracing will save your lower back.
It is also the lift beginners fear most, usually because they have seen someone round their back under a heavy bar. Fair enough — but the deadlift is one of the best things you can train for a back that has to survive desk work, travel and everything else. Loaded correctly, it makes you harder to injure, not easier.
The deadlift is not a lift you perform. It is a position you set, then defend for two seconds.
The six steps
Four of the six steps happen before the bar moves. That ratio is the whole point.
Feet hip-width apart, bar directly over the middle of your foot — roughly an inch from your shins. Looked at from above, the bar should split your foot in half. Toes forward or very slightly out.
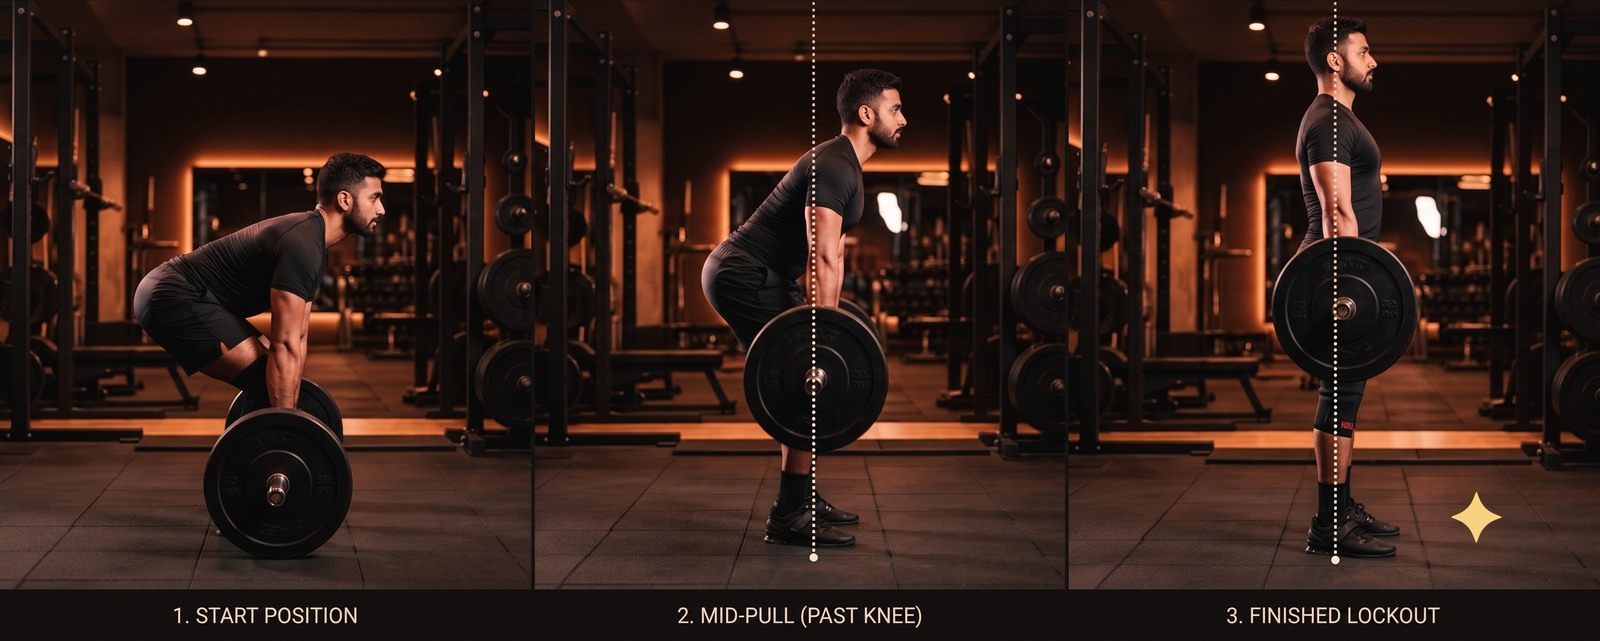
Push your hips back and let your knees bend only as much as they need to for your hands to reach the bar. Shoulders finish slightly ahead of the bar, spine neutral, chest proud without arching hard.
Pull your shoulder blades down toward your back pockets to switch your lats on, then pull the bar lightly into your shins until you hear the plates settle against the collars. Brace your midsection last. The bar should feel connected to you before it moves.
Drive through the whole foot and push the floor away rather than pulling the bar up. Hips and shoulders rise at the same rate so your back angle holds, and the bar stays in contact with your shins and thighs the whole way.
As the bar passes your knees, drive your hips forward and squeeze your glutes to stand tall. Ribs stack over pelvis, shoulders level. The rep ends when you are simply standing upright.
Reverse the movement: hips back first, then bend the knees once the bar clears them. The bar comes down the same vertical line it went up. Reset your brace and your position before every rep instead of bouncing off the floor.
Visual breakdown

Questions
Bend only as much as it takes to reach the bar with a neutral spine and your shoulders slightly ahead of it. Excess knee bend pushes your shins into the bar and forces it to travel around them. Too little bend turns the lift into a stiff-leg deadlift, which loads your hamstrings and lower back far more than intended.
No. In the start position your torso is angled forward — roughly 30–45° for most builds — and that is correct. What matters is that your spine is neutral rather than rounded or hyperextended, and that the angle stays the same as the bar breaks the floor instead of changing mid-pull.
Start double-overhand and let grip strength develop — it is a legitimate part of the lift. When the weight passes what you can hold, hook grip is the most secure option and keeps both shoulders even. Mixed grip works too, but loads the shoulders asymmetrically, so alternate sides if you use it.
Not for general strength training. Straps earn their place on high-volume pulling work where your grip fails before your back and legs do — a tool for accessory volume, not the main lift. Using them on every set stops grip strength developing at the same rate as everything else.
Film one set from the side. Three things tell you almost everything: the bar should leave the floor in a straight vertical line, your hips and shoulders should rise together, and your lower back should hold the same shape from floor to lockout. If the bar swings out or your hips shoot up first, the setup is the problem — not your strength.
Coached by Sumanth G
Terra Fitness India specialises in form-led, technique-first coaching for busy professionals and NRI clients across the US, UK, UAE, Canada, Australia and Singapore. In-person coaching in Hyderabad; online coaching worldwide.
Send us one side-view video. We will tell you the single thing to change.
Let's Discuss →Fifteen minutes, no card. We cover your current movement pattern, the one fix that would help most, and whether online or in-person coaching suits your situation.
Keep reading