Home / Fitness / How to Perform Bench Press Correctly

HowTo · Upper Body

How to Perform Bench Press Correctly

Shoulder blade stability, elbow angle and bar path — the three things that change everything.

Quick answer

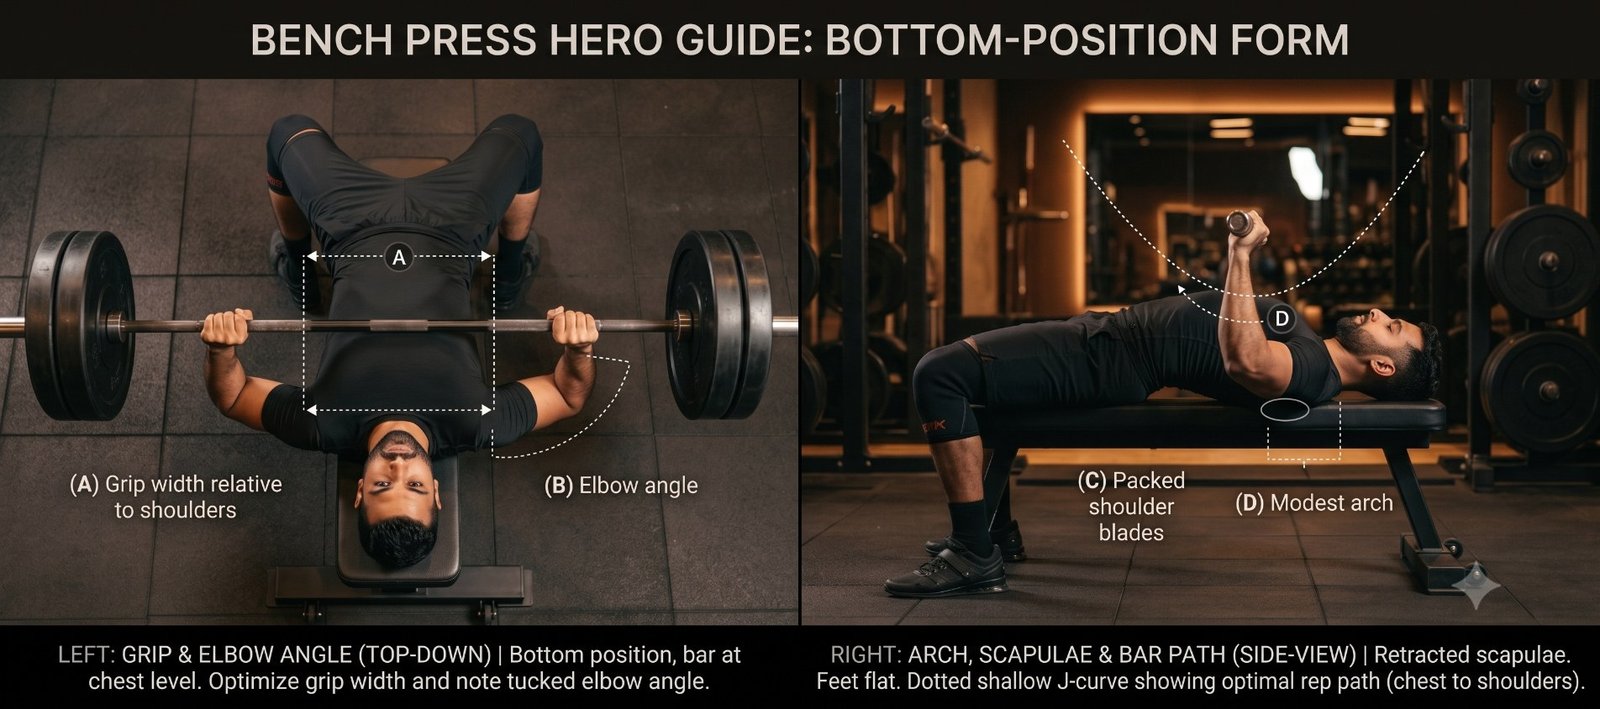
A good bench press starts before the bar moves: feet flat on the floor, shoulder blades pulled back and down into the bench, a small natural arch, bar above your chest. Lower under control to the sternum with elbows tucked around 45–75°, then drive through your feet and press the bar up and slightly back over your shoulder joint.

Bench press bottom position in two panels: top-down view showing grip width relative to the shoulders and tucked elbow angle, and a side view showing packed shoulder blades, a modest arch and the shallow J-curve bar path

Introduction

Most bench press problems are decided while the lifter is still lying still.

Bench looks like the simplest of the big three — lie down, push up. That is exactly why it is the one we most often rebuild from scratch. Your shoulder is the most mobile joint in the body, and on the bench it is pinned between a loaded bar and a bench pad. Whether it tolerates that or complains about it comes down to a handful of setup details: how your shoulder blades sit, where your grip lands, and what your elbows do at the bottom.

Get those wrong and you feel it at the front of the shoulder within a few weeks. Get them right and the same lifter usually adds weight immediately — not from new strength, but because the load is finally going through the chest and triceps instead of leaking into the shoulder joint.

The bar has to travel through one position your shoulder likes. Everything in the setup exists to find it.

The six steps

Setup to lockout

Steps one to three happen before the bar moves. If your shoulders hurt on bench, the fix is almost certainly in there.

1

Build your base: feet, hips, shoulder blades

Both feet flat and heavy on the floor, hips on the bench, shoulder blades pulled back and down as if tucking them into your back pockets. A small natural arch through the lower back is correct. This base is what you press against.

Why this matters: retracted shoulder blades give the shoulder joint a stable shelf to work from. Without it, every rep is pressed off soft tissue instead of a locked platform.
Common mistake: lying flat with the shoulders rolled forward and the feet tucked up on the bench — comfortable, unstable, and hard on the shoulder.
How we coach it: we set the base as a checklist you run before every set, so it never becomes something you only do when you remember.
2

Set grip width from your forearm angle

Choose the grip where, at the bottom of the press, your forearms are vertical from a side view and your elbows sit at roughly 45° from your torso. For most people that is slightly wider than shoulder width. Wrists stacked over elbows, not bent back.

Why this matters: vertical forearms mean force goes straight into the bar. Angled forearms leak force and load the wrist and shoulder instead.
Common mistake: copying a competition-width grip from social media. Grip width is a function of your arm length and torso width, not a number.
How we coach it: we find your grip from your own forearm angle on video and mark the ring position, so it is repeatable on any bar.
3

Unrack without losing your shoulder blades

Press the bar straight up out of the hooks, then bring it over your chest in one controlled movement — don't pull it out with your shoulders. If the blades come unpacked during the unrack, rerack and reset.

Why this matters: the unrack is where most setups quietly fall apart. Everything you built in step one can be lost in one second.
Common mistake: reaching for the bar and dragging it out, which rolls the shoulders forward before the first rep even starts.
How we coach it: we set your rack height and, on heavier work, use a hand-off so your position survives the unrack intact.
4

Lower under control to the sternum

Take two to three seconds down to your lower chest or sternum, elbows tucked around 45–75°, upper back tight against the bench. Touch lightly — no bouncing the bar off the chest.

Why this matters: a controlled descent is where the strength and the technique are actually built, and where flaring elbows get caught before they cause a problem.
Common mistake: elbows flaring to a full 90° at the bottom, which is the single most common cause of front-of-shoulder pain on bench.
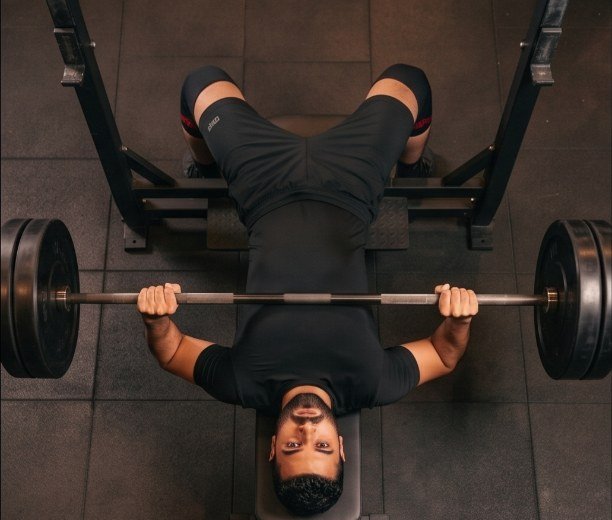
How we coach it: we film from directly overhead, because elbow flare is nearly impossible to see or feel from where the lifter lies.
5

Press up and slightly back

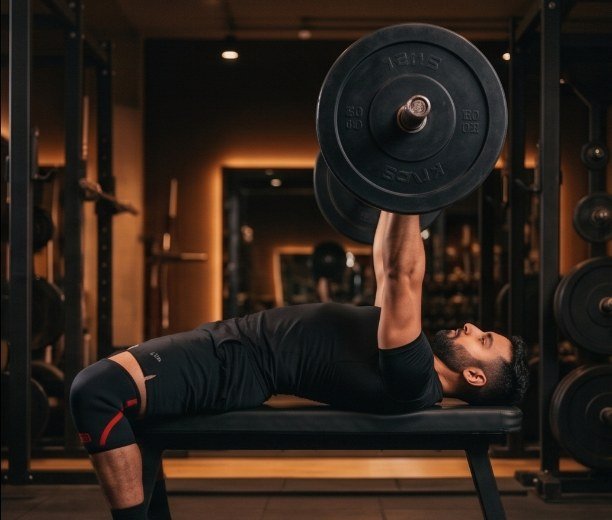
Drive your feet into the floor and press the bar up and slightly back, so it finishes over your shoulder joint rather than over your chest. The bar path is a shallow J, not a straight vertical line.

Why this matters: finishing over the shoulder puts the joint in its strongest, most stable position. Pressing straight up leaves the load out in front of it.
Common mistake: pressing straight up and stalling mid-range, or losing leg drive so the hips start to lift off the bench.
How we coach it: we cue the bar path from the side view and add leg drive only once your base holds without it.
6

Lock out without losing the arch or the blades

Finish with elbows extended, shoulder blades still retracted, hips still on the bench. If your shoulders roll forward at the top or your hips lift, the rep doesn't count — reset your base before the next one.

Why this matters: letting the blades release at lockout is how a set that started well ends with the last reps pressed from a compromised position.
Common mistake: pushing the shoulders up off the bench at the top to squeeze out extra range — it feels productive and quietly wrecks shoulders.
How we coach it: we judge the set by the last rep, not the first. If the base breaks at rep eight, the set was six.
Visual breakdown

Setup, descent, lockout

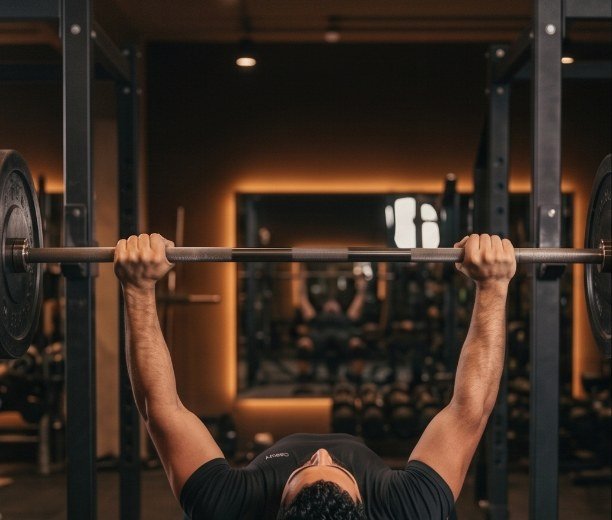
Bench press setup seen from behind the head: wide grip established on the racked bar with arms extended and head resting on the bench
01 · SetupView from behind the head — wide grip established on the racked bar, arms extended, head on the bench.
Bench press bottom position from directly overhead, the frame where elbow flare is visible
02 · DescentSame overhead angle at the bottom — the frame where elbow flare is visible.
Bench press lockout from the side: elbows extended with the bar over the shoulder joint, arch and shoulder blades intact
03 · LockoutSide view of the finish — bar over the shoulder joint, arch and blades intact.

Questions

Bench press FAQ

Should I grip narrow or wide?

Let your forearm angle decide. At the bottom of the press your forearms should be vertical from a side view, which for most people means slightly wider than shoulder width. Very wide grips shorten the range but load the shoulder joint far more. Narrow grips are shoulder-friendly and triceps-heavy, but harder on the wrists and elbows.

Should my feet be on the floor or on the bench?

On the floor, flat and heavy. Your feet are what you press against — they stabilise the torso and let you transmit leg drive into the bar. Feet on the bench removes that base, makes the lift far less stable, and offers no benefit unless a specific medical restriction requires it.

Is a back arch necessary?

A small natural arch is not optional — it is what lets your shoulder blades stay retracted and your shoulders sit safely. What is optional is the extreme powerlifting arch, a competition technique for shortening the range of motion. For general training, keep the arch modest and your hips on the bench.

Should I touch my chest or stop before?

Touch lightly, if you can do it while keeping your shoulder blades packed and elbows tucked. A controlled touch on the sternum gives you a consistent depth to train. If touching forces your shoulders to roll forward, stop just short and work on mobility and grip width rather than forcing depth.

Why do my shoulders hurt if my form feels right?

Usually one of three things: elbows flaring to 90° at the bottom, shoulder blades unpacking during the unrack, or a grip too wide for your build. All three shift load from the chest and triceps onto the front of the shoulder joint. Because it feels normal to you, this is the fault that most needs an outside eye on video.

Coached by Sumanth G

  • REPS India Certified Personal Trainer · ID REPSIN009446
  • K11 Diploma in Personal Training
  • NSQF Level 4 Fitness Trainer (SPEFL-SC)
  • Certified Human Performance Nutritionist

Terra Fitness India specialises in form-led, technique-first coaching for busy professionals and NRI clients across the US, UK, UAE, Canada, Australia and Singapore. In-person coaching in Hyderabad; online coaching worldwide.

Shoulder pain on bench isn't normal

One video from overhead usually shows exactly why.

Let's Discuss

Fifteen minutes, no card. We cover your current movement pattern, the one fix that would help most, and whether online or in-person coaching suits your situation.

Keep reading