Home / Fitness / How to Fix Squat Form

HowTo · Lower Body

How to Fix Squat Form and Stop Knee Pain

The exact coaching cues to diagnose why your knees hurt — and fix it in six steps.

Quick answer

Knee pain during squats usually means one of three things: your weight is in your toes instead of spread across the whole foot, your knees are caving inward (valgus collapse), or you are descending too fast without control. This guide shows you how to work out which one is yours — and the cue that fixes it.

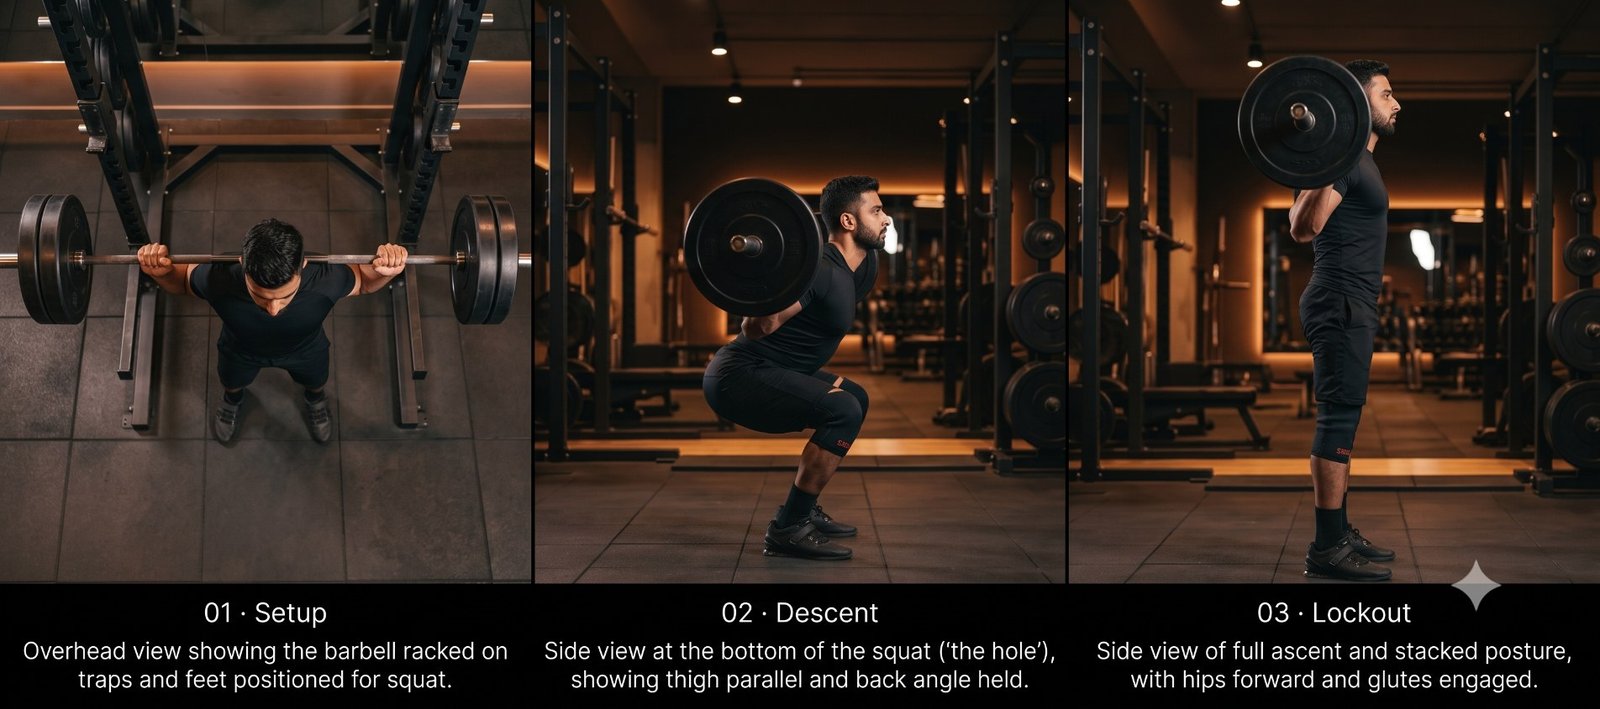
Back squat in three frames: overhead setup view with the bar racked on the traps and feet set, side view at the bottom of the squat with thighs parallel and the back angle held, and a tall lockout with hips forward and glutes engaged

Introduction

Knee pain in the squat is the single most common complaint we hear on an intro call — and it is almost never a knee problem.

The knee is where you feel it because it is the joint stuck in the middle. When the foot cannot hold a stable base, or the hips do not take their share of the load, the knee absorbs what is left over. That is why the usual internet advice — more core work, more stretching, more quad strength — does so little. You are strengthening around a positional fault instead of correcting it.

What actually works is boring and specific: find out whether the fault is in the foot, the hip or the tempo, fix that one thing, then reload. It takes real-time feedback, because the position that hurts is rarely the position you think you are in. Everything below is the same sequence we run in a first session — foot, brace, hip break, knee track, depth, drive — in the order it needs fixing.

Form is not something you have. It is something you set up, rep after rep — and every rep is either practice or rehearsal for the injury.

The six steps

Fix it in this order

Work top to bottom. Each step assumes the one before it is in place — fixing knee tracking before you have a stable foot just moves the problem.

1

Set your stance and screw your feet in

Feet roughly shoulder-width, toes turned out 15–30°. Spread your toes, then screw both feet outward into the floor until you feel tension build in your hips. Your weight sits across the whole foot — big toe, little toe, heel — with the arch supported rather than collapsed inward.

Why this matters: the foot is your only contact with the floor. An unstable base means the knee has to stabilise a load it was never designed to steer.
Common mistake: standing too wide with feet parallel, or letting the arches roll in the moment weight is added — both drag the knee inward before you have even moved.
How we coach it: we set your stance width from your own hip structure and unloaded squat, not a fixed rule, then test it against a heavier set.
2

Brace before you move, not on the way down

Breathe into your belly, not your chest, and tighten your midsection as if you were about to take a punch. Hold that pressure for the whole rep and breathe out at the top. The brace should feel like 360° of tension around your waist, not a sucked-in stomach.

Why this matters: an unbraced trunk lets your ribs drift and your pelvis tip, which changes hip angle mid-rep and pushes load forward onto the knee.
Common mistake: bracing after the descent has already started — by then the position you were trying to protect is gone.
How we coach it: we build the brace as its own drill before it is ever attached to a squat, so it survives under load instead of disappearing at rep three.
3

Break at the hips first, then the knees

Start the movement by sending your hips back and down together, rather than pushing your knees forward first. The cue that works for most people is sit between your heels, not sit back — you want to descend between the feet, not behind them.

Why this matters: a hip-led break shares the load between hips and knees. A knee-led break sends your shin forward early and loads the joint for the entire descent.
Common mistake: overcorrecting into a good-morning squat — hips shooting back so far that the chest folds and the bar drifts ahead of mid-foot.
How we coach it: we film from the side and use your own shin angle as the feedback, so you can see the break instead of guessing at the feel.
4

Track your knees over your mid-foot

On the way down, drive your knees out over the line of your second and third toes. The knee travels in the direction the foot points — never inward. Keep pressure balanced across the tripod of the foot the whole way through.

Why this matters: inward collapse (valgus) puts shear stress across the knee and shuts down the glutes right when you need them most.
Common mistake: knees holding position on the descent then caving on the drive out of the bottom — the fault is almost always hidden in the ascent.
How we coach it: we watch the front view on the ascent specifically, and use loaded tempo work rather than bands so the correction transfers to your working sets.
5

Own the depth you can control

Descend to the lowest point where your pelvis stays neutral and your heels stay planted — then stop. For most people that lands at or just below parallel. Take three to four seconds down at first; speed hides everything.

Why this matters: the last few centimetres past your usable range are where the pelvis tucks under and the lower back takes over. Depth you cannot control is not depth, it is a collapse.
Common mistake: chasing ass-to-grass depth because it looks impressive, and bouncing out of the hole to get back up.
How we coach it: we set your depth from an assessment of your actual ankle and hip range, then work to open that range instead of forcing it.
6

Drive up through the whole foot and finish tall

Push the floor away through the entire foot, leading with chest and hips together so the bar travels in a straight vertical line. Finish standing tall — ribs stacked over pelvis, glutes squeezed — without leaning back at the top.

Why this matters: leading with the hips alone folds you forward; leading with the chest alone stalls the bar. Together they keep the load over mid-foot where the hips can drive it.
Common mistake: heels lifting or weight rolling to the toes on the drive, then hyperextending the lower back to finish the rep.
How we coach it: we cue the finish as part of the rep, not an afterthought — a clean lockout is how we know the pattern held under load.

Visual breakdown

Right vs wrong, at the bottom position

✓ Right
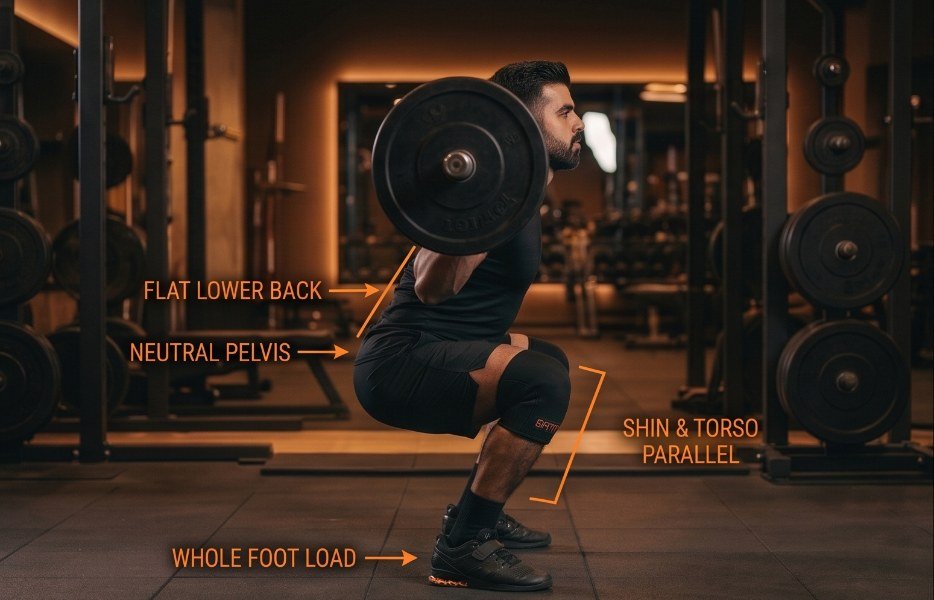
Correct squat bottom position, side view: flat lower back, neutral pelvis, shin and torso parallel, whole foot loaded
Whole foot loaded, knees over mid-foot, neutral pelvis. Shin angle matches the torso lean, bar sits over the middle of the foot, arches held.
✗ Wrong
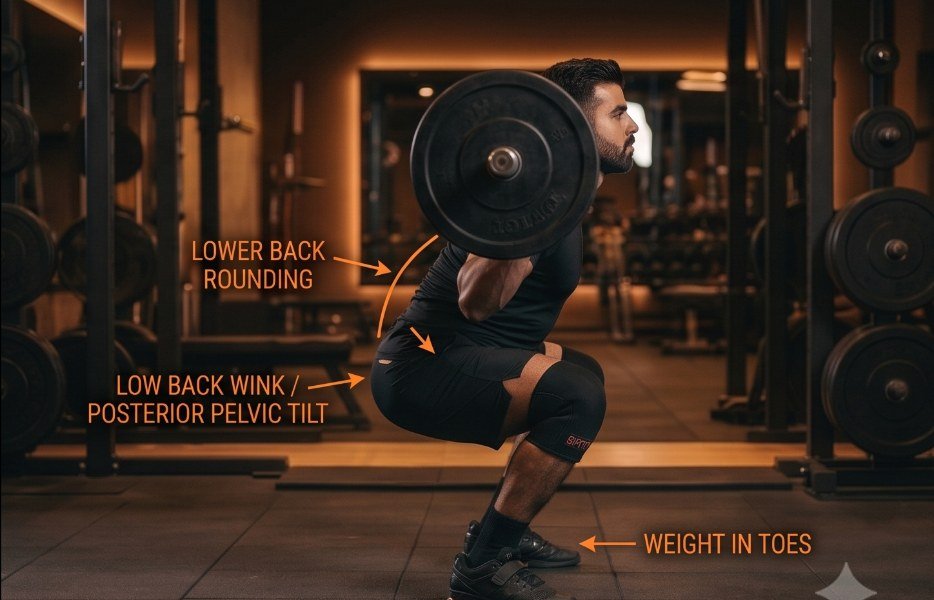
Incorrect squat bottom position, side view: lower back rounding, low back wink from posterior pelvic tilt, weight shifted into the toes
Weight in the toes, lower back rounding, pelvis tucked under. Heels light, arches collapsed, and a low back wink at the bottom of the descent.

Questions

Squat FAQ

Do I need special squat shoes?

Not special, but stable. Flat-soled shoes or bare feet let you feel and use the whole foot. Avoid thick cushioned running shoes — the compressible foam makes your base unstable and pushes weight into the toes. Raised-heel lifting shoes can help if limited ankle mobility is stopping you reaching depth, but they are a tool, not a fix for mobility.

How deep should I squat — parallel or below?

As deep as you can go while keeping a neutral pelvis and planted heels. For most people that is hip crease level with or slightly below the knee. If your lower back rounds under at the bottom, you have gone past your current usable range — stop above it and train ankle and hip mobility to open more range over time.

Should my knees go past my toes?

Yes, and that is normal. Knees travelling forward over the toes is a natural part of squatting, especially for taller lifters and in front-loaded squats. Knee pain comes from the knee drifting inward, weight collapsing into the toes, or an uncontrolled descent — not from the knee passing the toe line.

Can I fix my squat form on my own, or do I need a trainer?

You can make real progress alone by filming every set from the side and the front and checking it against known cues. What you cannot easily do alone is work out which of several possible faults is causing your pain, and in what order to fix them. That diagnostic step is where coached feedback saves months.

How long does it take to fix bad squat form?

Most people feel a difference within two to three sessions once the cause is correctly identified, because the fix is usually positional rather than a strength problem. Making the new pattern automatic under heavier load takes about four to six weeks of consistent practice with reduced weight.

Coached by Sumanth G

  • REPS India Certified Personal Trainer · ID REPSIN009446
  • K11 Diploma in Personal Training
  • NSQF Level 4 Fitness Trainer (SPEFL-SC)
  • Certified Human Performance Nutritionist

Terra Fitness India specialises in form-led, technique-first coaching for busy professionals and NRI clients across the US, UK, UAE, Canada, Australia and Singapore. In-person coaching in Hyderabad; online coaching worldwide.

See if Terra's approach fits you

Fifteen minutes, no card, no obligation.

Let's Discuss

What we cover: your current movement pattern, the one fix that would help most, and whether online or in-person coaching suits your situation.

Keep reading